

Normally, basting a quilt calls for a large, flat surface that you can spread out your quilt on. Most people use a floor. But what if you live in a small space, and you don’t have enough room to spread out your quilt on the floor? What if you’re making a quilt that is WAY bigger than your bed, or any other flat surface in your home?
I often find myself in exactly this situation. My boyfriend and I live in a 400 sq ft. apartment in the Bay Area. There isn’t room to baste even a throw-sized quilt on the floor. Luckily, I’ve come up with my own method to pin baste quilts on almost any surface!
I used this basting method on my Twin-sized Petal Points quilt. And I'm happy to report that there was not a single pucker or pull in the finished quilt!
This method takes longer, but gives you consistent results. And you can baste on a small table, a desk, or even your lap!
I’ll show you this technique step-by-step.
Press Your Quilt Top
\
Just like any other basting method, you’ll start by pressing your quilt top. Don’t skip this step! Pressing now ensures that all of your seams will fall correctly on your finished quilt, and helps prevent puckers when you quilt.
Piece Your Backing
Whether you’re basting normally or using this small-space technique, you’ll need to prepare your backing. Generally, you’ll want your backing to be 2-4” bigger than your quilt on all sides. The small-space basting we’re going to be doing will make it a bit harder to tell if our quilt top is perfectly lined up. In this case, more backing and batting overhang is better! I like to go closer to 4” of overhang on each side.
If your backing needs to be pieced, cut as instructed in the pattern, and attach the panels of fabric to one another with a 1/2” seam allowance.
Press the seam to one side for stability, then continue to the next section.
If you aren’t sewing from a pattern that includes backing instructions, you can easily calculate your own backing dimensions and yardage, and piece your backing to the appropriate size.
Baste Backing to Batting

This is key! Instead of jumping right into making our quilt sandwich, we are going to start by basting JUST the backing and batting together. Starting with one corner, spread out your batting, and smooth your backing over the top, right-side-up.
You’re essentially making one half of your quilt sandwich.

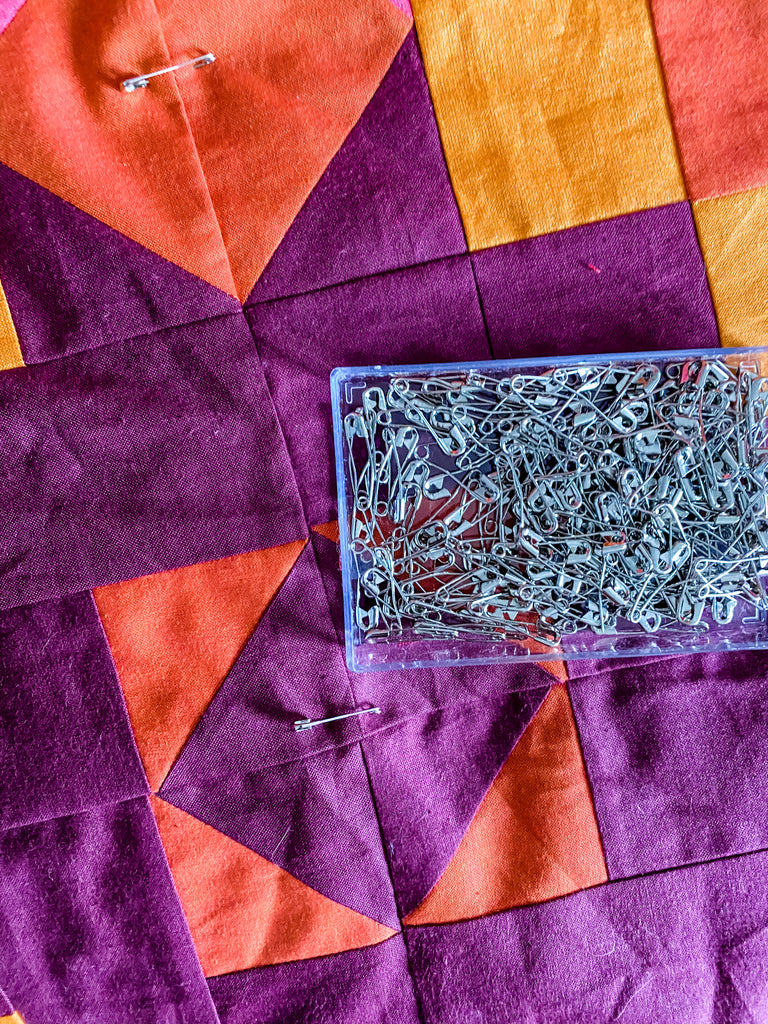
Pin from the backing side. I use these special bent safety pins from Dritz. The clasp of your safety pins should be on the right side of the backing, so you can remove these pins easily after your quilt sandwich is finished.
You will start pinning in one corner, and work your way out across the quilt. Work over the quilt a small section at a time, smoothing the two layers together between your hands, with no bumps or puckers. You only need to pin every 8-12 inches — I’ve found that this is enough to keep these two layers together in the next step.
Make Your Quilt Sandwich
If you don’t have a ton of open space, the step of making your quilt sandwich ends up being, um, approximate.
You’ll want to lay out as much of your quilt backing-and-batting as you can, then put your quilt top on top. You might have to start with a small portion of your quilt— just one side, or maybe one corner.

Here, I was basting a twin-sized quilt (my Petal Points quilt) on my couch, and mostly on my lap. When it was time to make my quilt sandwich, I spread out one short side of my backing-and-batting over the couch as best as I could. I lined up this up to my quilt top, which I tried to center over the two bottom layers.
The important thing here, is that ALL of the quilt top has batting and backing behind it, whether it’s centered or not. You don’t want your quilt top dangling off the edge on one side!
At this point, you’ve made part of your quilt sandwich. Things aren’t fully lined up, but at least one corner or edge of your quilt is sandwiched. (You haven’t started pinning the sandwich yet!)
Move the sandwiched edge of your quilt — I like to roll it up to get it out of the way— and then continue roughly sandwiching your layers together until all of the quilt top is positioned over the batting and backing.
At this stage, keep in mind that you’re just getting your sandwich roughly positioned. Your layers won’t be perfect here, because it’s impossible to get things wrinkle-free on a bumpy surface. That’s okay - we’ll fix this as we pin.
Start Pinning The Quilt Sandwich
This is the slowest part of my small-space basting technique. Being extra careful with this step means that your quilt will end up perfectly basted, whether you’ve got a lot of space, or not!
Move your quilt again, and position it so a small area - one corner of the quilt - is on your work surface.

In my case, I sat on my couch, and held my quilt sandwich so the top left corner was in my lap.
Grab the quilt sandwich and make sure it’s lined up in the corner. Flatten the sandwich in your lap or on your surface, focusing on a manageable area at any given time — about a square foot works for me. This time, make sure that that area you are working on IS perfectly flat and lined up.
Pin in the corner, then work your way out. I like to place my pins on a grid, every 6” - 8”.
If you are pinning a 12” square from the corner of your quilt, this is what your pinned area might look like:
Smooth As You Go

Here’s the key to small-space basting. You work one little section at a time, and when you’ve pinned one section down, you (carefully) move on to the next.
Moving out from the corner, position a new, unpinned section of your quilt over your work surface. Starting with where you last pinned, smooth the backing, batting and quilt top together. Make sure there are no folds or puckers anywhere in your previously pinned area, or your new area.
I like to use both hands to smooth the quilt sandwich, keeping one hand on the quilt top and one hand on the quilt backing. I pull outwards from an already pinned area, pulling all of the layers taut and even.
When you’re sure that there are no pulls or puckers, pin the new area you’ve smoothed on your work surface.
Continue smoothing and pinning across and down your whole quilt.
Check Your Work

Every so often, pause to check your work. This will save you a ton of trouble down the line.
Examine the last few sections of your quilt that you’ve been working on. Are there any bumps? Any odd stretching or pulling on your quilt top or backing? Is the backing twisted? If you notice any of these things happening, remove the pins around the problem area, and smooth the quilt sandwich again.
It is super important to get your quilt flat throughout this process! Any bunching here will only be amplified when you quilt.
Remove Your Backing-And-Batting Pins
Remember those pins we placed to hold the backing and batting layers together? The ones that don’t go through the quilt top? At this point, we want to remove all of those— we wouldn’t want to accidentally sew over one when we go to quilt!
Flip your quilt over, with the backing side up, and remove all of the backing-and-batting only pins.
That’s It!

When you’ve removed all the pins on the back of your quilt, you’re ready to quilt however you’d like! If you’ve taken your time basting this way, you will end up with a fully basted quilt that is just as flat as one basted normally on the floor.
4 comments
Hi Joanne! It sounds like you’re going to self-bind the quilt by sewing three sides and turning inside-out. I’ve never tried this method before. Usually, I will just use this basting method, machine quilt, and then machine bind: https://strawberrycreekquilts.com/blogs/blog/how-to-bind-a-quilt
For the technique you’re using, my guess is that it won’t matter where you start and finish your quilting, if everything is basted well. I would use a lot of safety pins and be really careful that you’re getting everything flat!
Hope that helps :)
Love your directions! So easy to follow. Just a couple questions…
I am making a throw size quilt, planning to sandwich the layers together but to sew on three sides and turn right side out through opening on end. I would smooth out and pin it as you did, but I want to machine quilt it instead. To do this, is it better to start sewing in the center of quilt to work outwards, or will it make a difference anyway? I have done this style many years ago but memory is not serving well. Hope you can offer some help here. I am hoping to do 2 more throws between now and Christmas if possible. Thank you
I cannot wait to try this. Thanks!!
Thank you. I will try this method. I love making the quilt tops but equally HATE making the sandwich because of the small space I have to work in.