
The Challenge
Every year, Aurifil + Olfa team up for the Stitch and Slice Challenge. Both companies challenge their artists to create fun new projects with their tools and materials. When I heard that this year’s theme was gift giving, I knew I wanted to show you how to make these cute potholders!

These potholders are a quick, scrap-busting make. They gift well around the holidays, and you can make them in a variety of colors depending on your style. Make a few in an afternoon and you’ve got gifts for your neighbors, colleagues, or dinner hosts.
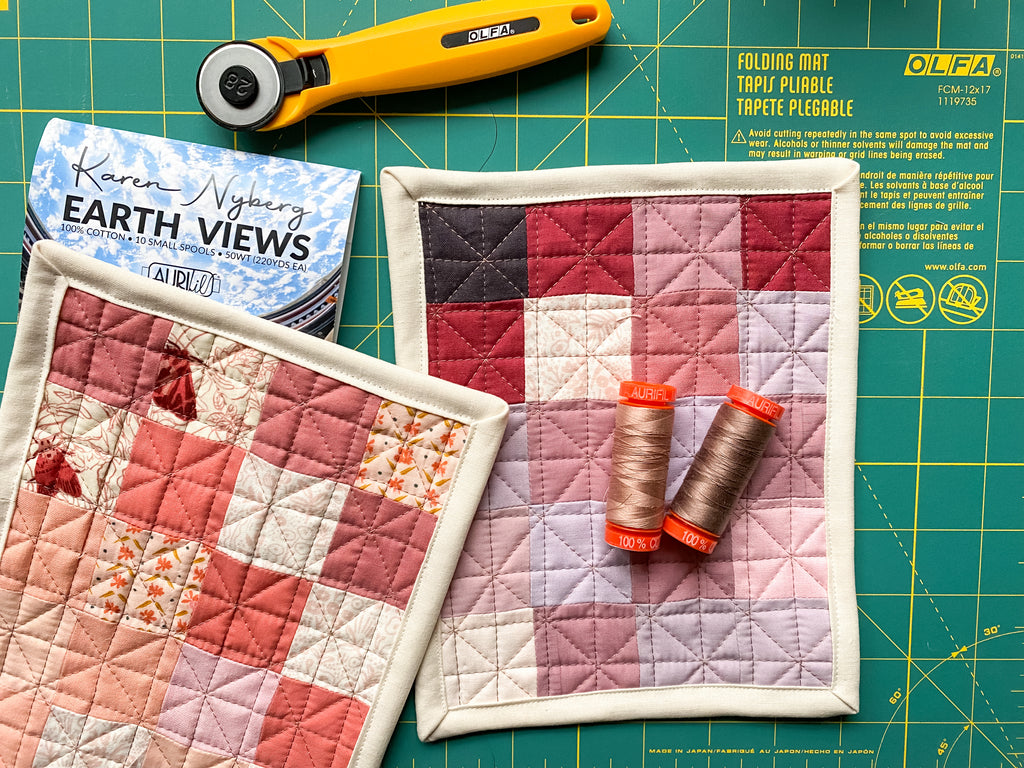
I used Karen Nyberg’s Aurifil Thread collection, Earth Views, for color inspiration. Karen is an astronaut who sews (life goals!) and this collection is full of beautiful, muted, earthy tones that reflect views of our planet from space. Here's a little peek at all the wonderful colors in this collection. As you can see, it's fully Reggie-approved:


Reggie has always dreamed of being an astronaut, and thinks Karen is super cool!
Olfa sent me their 12” x 17” Folding Cutting Mat, and their 28 mm Quick-Change Rotary Cutter. Both are great classic tools that fit into small spaces (hello, 400 sq ft apartment!). A fresh cutting mat and a sharp blade were perfect for helping me tackle my scrap pile!
Supplies
- Assorted quilting cotton scraps - enough for (20) 2” squares
- Heat-resistant batting, 8” x 11"
- You may use two layers of 100% cotton batting, or a single layer of an insulating batting like insul-brite
- Backing fabric, 8” x 11"
- 2” x 3” piece of quilting cotton, for hanging loop
- 2 1/4” x 40” strip of quilting cotton, for binding
- 100% cotton thread, 50wt, assorted colors for piecing and quilting
NOTE: The most important thing here is that your fabric, thread, and batting are 100% cotton. Cotton can withstand high temps, and is very insulating. Other materials, like polyester or rayon, will melt when exposed to heat. This can cause injuries and messes! You may use insul-brite or a similar insulating batting instead of cotton, but it needs to be heat proof.
Instructions
Step 1: Select and trim scraps

I started by sorting my scraps into piles by color. Since I was drawing from the Earth Views thread collection for inspiration, I started to match different scraps to different spools of thread. I am really in love with the color range— two beautiful mossy greens, three blues, two golden tans, two mauve-pinks, and a white.

I began collecting my green scraps, then some assorted pinks, purples, and blues.

Press your scraps and trim each to 2” square. You’ll need 20 squares for a 6” x 8” potholder.

Step 2: Assemble patchwork potholder top
Lay out your 2” fabric squares into a 4 square x 5 square rectangle. Rearrange until you're happy with the layout.

Then, sew the squares together to create rows. I chain pieced these to save time. Press seams open.
Sew the rows together, and press seams open again.

You can see that I experimented with a few different layouts. A grid of 4x5 squares, roughly 6 x 8 inches, was my favorite.
Step 3: Quilt
I’ll show you the quilting and finishing steps on my set of purple-pink potholders, because I love how these turned out best!

Layer together your potholder top, batting layers, and backing. If you’re using 100% cotton for your batting, be sure to include both layers.
Pin the layers together - I found that pinning the 4 corners worked well.
TIP If you are making these potholders in many colors, you can save some time and energy by choosing a single neutral backing color for all of them. That way, you can wind a bobbin in a single neutral thread color, and leave it in your machine while quilting all of the potholders. Simply switch out your top thread to match each one.
I decided to quilt a modified grid, using two colors of thread for depth. I used Aurifil Tiramisu #6731 and Aurifil Antique Blush #2375 from the Earth Views Collection.
I started by quilting horizontal and vertical lines about 3/4” apart, in Tiramisu, the darker mauve color.

Then, I switched to Antique Blush, the lighter mauve-pink thread. I quilted lines on the diagonal in one direction, cross-cutting every other diagonal row of squares.

Then, I quilted more lines on the diagonal, running in the opposite direction.

TIP I love the idea of quilting small, neat grids on these patchwork potholders using multiple colors of thread— especially close shades, like the ones you’ll find in the Earth Views collection. It creates so much depth!

TIP Your quilting doesn’t need to be perfect here to create a cool effect. You’ll notice some slight puckering and warping of my fabric if you look closely at the pictures, which is totally normal when you’re working with a double layer of batting. And you’ll see that my grid isn’t perfectly straight - sometimes my diagonal lines don’t intersect perfectly with the horizontal and vertical ones. But these imperfections aren’t that noticeable when you’re done! Give yourself some permission to simply practice your stitching here, and let the pattern of the patchwork and the overall effect of your design work their magic.
Step 4: Trim and add a loop

Trim your potholders and make sure the corners are square and edges are straight.

Fold your 3” x 2” strip of fabric in half lengthwise. Then, fold the raw edges in towards this center line. You’ll essentially create a 3” long strip of fabric with raw edges enclosed inside. Stitch along the outer edge. This will be your hanging loop.

Fold your strip of fabric in half, and line it up to the edge of your potholder, on the wrong side, about 1” away from a corner. Sew into place about 1/8” away from the edge.

Step 5: Bind and finish
Fold your 2 1/4” x 40” strip of fabric in half lengthwise, and press or crease to create your double-fold binding.
On the reverse side of your potholder, pin your binding into place, matching the raw edges of the binding to the edges of the potholder. You will want to leave about a 4” tail along one side, then begin pinning.

Or normally, you would pin. You can see that I jumped right ahead here and started sewing. Do as I say, not as I do.
Leaving the 4” tail of binding loose along the first side, sew the binding on with a 1/4” seam allowance. Stop sewing 1/4” before the corner. Backstitch and cut your thread.
To miter the corner, fold your binding out at a 90 degree angle.

Then, fold it back again, along the next edge of your potholder.

Pin into place. Continue sewing 1/4” away from the corner.
Work your way around the potholder. When you get back to the first side, sew down your binding just an inch or so. You want long thread tails at both ends of your binding, and a gap of 4” or more where the binding isn’t sewn down.

Line up your binding tails, and neatly fold them back where they meet to create a flush edge. Create a strong crease with your fingernail.

Using scissors, trim about 1/4” away from the crease.
Sew the binding ends together. You may have to fold your potholder to bring the ends together neatly.

Then finger-press the seam open, flatten out your binding, and line it up to your potholder edge. Stitch down the last loose bit of binding.

To finish machine-binding, flip your potholder over and fold the binding around the edge. Miter any corners, folding the binding around them neatly. Topstitch the binding in place around the entire potholder, backstitching where you start and stop.

Ta-da! Bring these to your next family gathering, spruce up your own dining table, or gift away! These are a super cute and colorful way to show some love during the holidays!


Disclosure: I received supplies from both Aurifil + Olfa so I could use them for this tutorial, but this isn't a sponsored post! I am part of Aurifil's Artisan Program for the 2021-2022 year, so they supply thread for my projects, and I occasionally create special tutorials to showcase their collections. I also use Amazon Affiliate Links in my posts, but I only link to products I actually use!
3 comments
Спасибо за подробный мастер-класс!!!! Прекрасная и очень красивая идея! Я только учусь, очень хочу сделать лоскутное одеяло. Надеюсь, что у меня все получится!
Thank you for a wonderful hostess gift, holiday gift idea!
Beautiful! Just beautiful!