
Anyone who learns to sew or quilt quickly learns that pressing is a huge part of the process. Pressing your blocks and ironing your yardage keeps your project looking sharp. And it's a step that is almost impossible to avoid. Most sewists and quilters will whip out their full-sized ironing board to press their project. But, I've found that something small, multi-functional, and portable works better for me.
I've been sewing in small spaces for the last decade-ish, and over time, I've tried and tested a number of pressing station setups. A built-in wooden ironing board in the kitchen of my 1920's studio apartment. A full-sized heavy duty ironing board in a too-small sewing area. A stack of towels laid over my bed. An Ikea mini ironing board. A felt pressing mat.

I've tried out different irons, too: A Black & Decker that I bought during my college dorm years. A Rowenta I found in my boyfriend's closet, collecting dust. And now, a fancy smart iron sent to me by Oliso.
Today, I'm sharing two pressing setups that have become favorites. Both of these are easy to put together, and work well for my small studio space. If you sew in a small space, I think they'll work for you, too.

My Requirements
This is my criteria for any ironing setup.
-
My desk needs to be an all-in-one sewing station, easily converting from cutting station to sewing machine space to pressing station.
-
The pressing surface must be small, lightweight, and easy to tuck away when not in use.
-
The iron must be reliable and durable. It must press fabric quickly, without singeing, burning, or leaking.
-
I must be able to press quilt blocks, clothing projects, and yardage with my setup.
-
The whole thing has to be fairly long-lasting, requiring minimum maintenance and upkeep.
Two Setups That Have Worked For Me

Mini Ironing Board + Rowenta Effective
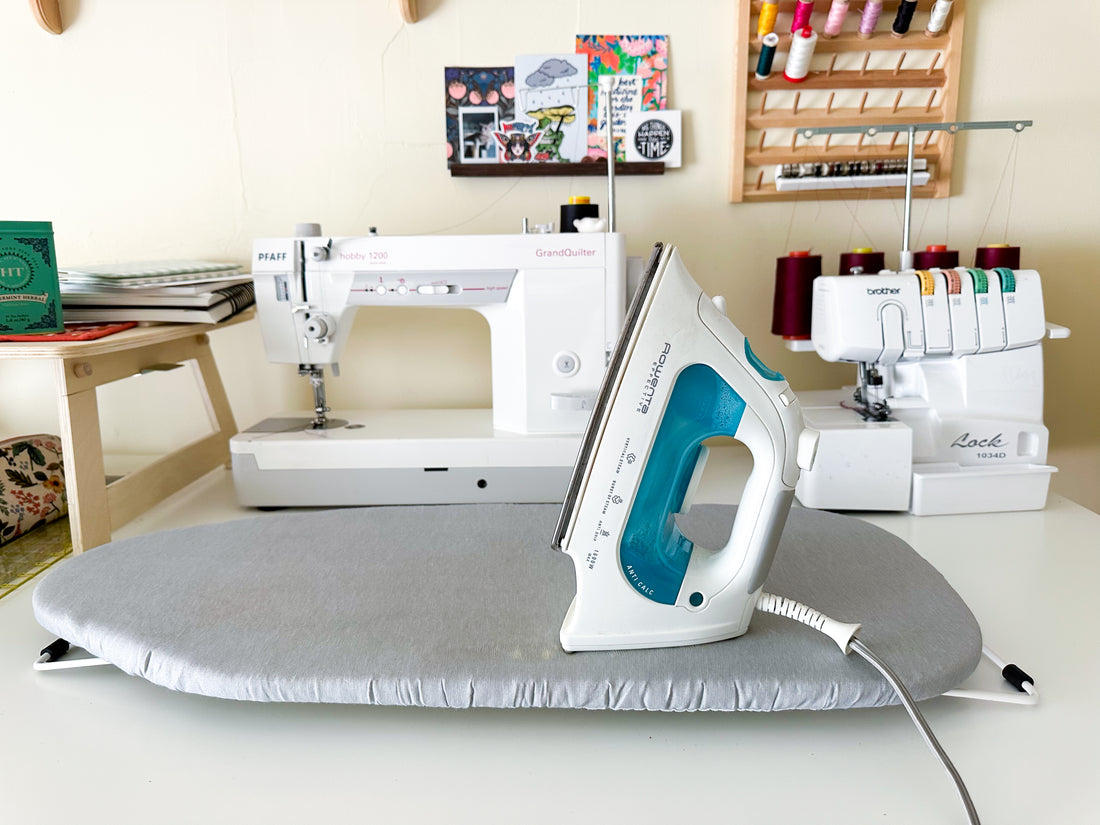
This is a practical setup that I've been using for nearly four years now. It's simple, effective, and economical. It's what I would recommend for beginners and budget-minded experts alike.
I love my Ikea mini ironing board (original here, similar here) for how easy it is to whip onto and off of my sewing table. It's actually extremely lightweight. The short legs raise the board off the desk without being clunky.
I've used my mini board for over four years now, and it's still going strong!
Note that you will need to replace the mini ironing board cover over the years, especially if you're doing a ton of pressing. I liked the original Ikea version and this Amazon one. (I used both for over a year with no issues!)

Currently, I have this cover from Amazon, and it's terrible. My cotton iron setting immediately warped the fabric covering on the outside, something that should never happen. Do not buy. Stick to this one.

My tried-and-true iron is this Rowenta.
It's the Rowenta Effective, which is no longer made, but looks similar to the Rowenta Focus. My boyfriend owned this iron for years before we met, and I started using it for quilting around 4 years ago, too. So it's been working well for over a decade, with 4 years of heavy use for quilting and sewing.
While it's missing a couple of key features compared to the Oliso Smart Iron, I actually love so many things about my old Rowenta Effective. For one, durability and longevity. It works just as well today as it did ten years ago. The heat is even, and the steam and spray functions work well. It's pretty easy to maneuver. And the plate is durable, and stays clean most of the time. (Well, when I'm not making a mess with fusible interfacing or waxed fabrics...)
The equivalent Rowenta model you'd want today is probably the Rowenta Focus. And at $80, it's a high-end iron, but still well below the price of an Oliso.

Felt Pressing Mats + Oliso Smart Iron
Last month, Oliso sent me one of their Smart Irons and a pair of their wool felt pressing mats, so I could try out a new setup. I'm happy to report that it's working for me! I love it, and it hits the marks of portability and quality that I look for in an ironing setup.
This setup does feel more premium and full-featured than my basic mini board + Rowenta iron setup. Specifically, I'd recommend these tools if you're pressing a lot of quilt blocks, and if you go back and forth between your iron and your sewing machine often.

First of all, the Felt Multi-Mats! I've been wanting to try a wool pressing mat for such a long time. I can report that they do a good job providing a smooth surface and distributing heat. They are made of New Zealand wool and do smell vaguely sheep-y when in use. I suspect that will fade after a few months, but it also doesn't bother me too much.
The single pressing mat is small enough for me to keep out on my desk while I sew, but also light enough that I could quickly stash it away.
One thing that's unique to the Oliso Multi Mat is that it has punched out holes and silicone links in each corner. You can use these to link multiple mats together, creating a larger pressing surface. I tried linking my two mats, which worked mostly fine. It still felt weird to press yardage on the felt mat, so I'll save that for my mini ironing board.

The Oliso Pro Plus Smart Iron also feels so fancy! I love it. While it hits many of the same marks as my old Rowenta -- even heat, reliable steam features, a functional plate -- it has a couple of tech-y touches that set it apart.
The most well-known feature of the Oliso Smart Iron is that it automatically lowers when you touch the handle, and raises when you remove your hand. Oliso calls this "iTouch". It's the kind of high-tech feature that makes me a little nervous (what if it breaks?!) but is actually so nice to have. Especially if you're anxious about leaving your iron down and burning down the house, like I am.
Similarly, I love the auto shut-off feature. If you don't touch the handle for 30 seconds, the iron will shut off. Again, this is so good for my anxiety. And it also means that I can leave the iron plugged in while I sew, off to one side, ready for pressing when I need it.

You can absolutely get by without the features of the Oliso Smart Iron. And if you're a beginner, or happy with the iron you have, you probably don't need it! However, it is great for quilters who want to leave their iron out and on between steps. I'm imagining constructing log cabin blocks and actually pressing between each subsequent "layer," and moving smoothly between the iron and my machine -- dreamy.
Psssst-- Oliso also makes a Mini Iron if you're looking for just the basic features in an even smaller footprint. It's just $60!
Product Recommendations
Giveaway
I'm teaming up with Oliso on an Instagram Giveaway! Head over here to enter, by Saturday, August 6th, 2023 at 11:59 PM Pacific. For an extra entry, use this link to sign up for my email list. Giveaway is open to US residents only and not affiliated with Instagram.
Disclosures
Oliso Home sent me their Smart Iron and 2 Multi Mat Felt Pressing Pads to try out. They gifted me these items in exchange for an Instagram post + giveaway (which is open here until August 6th, 2023 at 11:59 PM Pacific). I wasn't asked to write this blog post, and I received no compensation for sharing here or on Instagram. All opinions are my own.
I have used Amazon affiliate links in this post where possible. Affiliate links support my business, and it helps when you use them!